Home standby generators are the ideal solution for ensuring your residence always has electricity and protection against power outages. Unlike portable generators, home generators are permanently mounted outside the home, have a steady fuel source, and are directly wired into your electrical system. If you’re planning on having a home generator installed, here are all of the steps that will be involved with the process.
Choosing the Generator Location
There are very specific fire code regulations that dictate where generators can be installed, and local municipal ordinances can also play a role. To conform with the National Fire Protection Association’s code requirements, there must be at least 1.5 feet of clearance between the generator and your home or any permanent outbuildings like a shed or detached garage. NFPA code also requires that generators have to be a minimum of 5 feet away from any exterior doors or windows.
Generators produce carbon monoxide and other harmful exhaust fumes, and the NFPA code requirement is to ensure that the exhaust fumes can’t get inside your home. This is also why the code states that the generator has to be installed so that the exhaust pipe points away from the house. Code requirements also state that any plants, shrubs, and other vegetation within 3 feet of the generator can be no more than 12 inches tall. This is to lessen the risk of the vegetation potentially catching fire.
While the NFPA only requires generators to be 1.5 feet away from buildings, most manufacturers recommend that there is at least 5 feet of clearance between the generator and any buildings. It is important to always follow whatever the manufacturer’s recommendations are or else the warranty on your generator will automatically be void.
Municipal regulations also typically state that generators have to be at least 5 feet away from your property line. Some locations also state that the generator has to be at least 20 feet away from any building or permanent structure. The fact that the regulations can vary so much makes it important that you hire a knowledgeable local electrical company to ensure that your generator meets all of the necessary requirements.
All of the various recommendations, regulations, and code requirements will dictate where your generator can go. When possible, you’re typically best to place the generator further away from the home. This will help to ensure that strong winds can’t blow the exhaust fumes into your house. Standby generators are also fairly noisy, and installing your unit further away from your house will help to lessen the amount of noise you hear whenever it runs.
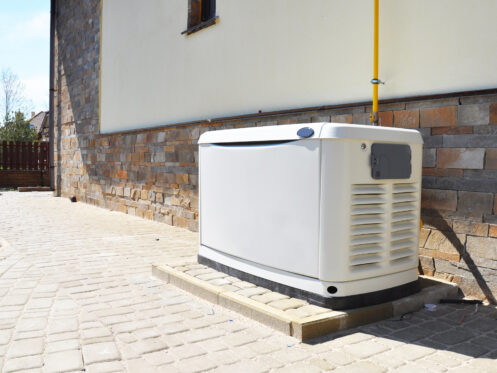
Installing a Pad and Mounting the Generator
Home generators must be permanently mounted on a level surface. You can just prepare a level bed of gravel for the generator to sit on, but this will likely lead to the generator shifting or settling over time and eventually needing to be releveled. This is why it’s always better to install the generator on a concrete pad. After pouring the pad, wait several days before the generator can be brought in and set. This is to ensure that the concrete has sufficient time to fully harden and start to cure.
The size and weight of the generator will dictate how big and how thick the concrete pad needs to be. Soil composition can also dictate the size of the pad and where it can go. If the soil on your property is prone to settling or shifting, you’ll likely need to have a larger area dug and different fill dirt brought in. It’s also important that the area where the pad and generator will be has proper drainage and isn’t prone to flooding. Otherwise, the pad can quickly start settling to the extent that you may end up needing to have it torn out and replaced.
Wiring the Generator to Your Electrical Panel
Once the pad has been prepared and the generator is in place, the electrical company will then start the process of wiring it and connecting it to your electrical system. It will usually take around a full day to safely connect the generator to your home and your power supply, and your electricity will need to be shut off for most of the process.
A heavy-duty, waterproof electrical cable will be run from the generator to wherever your main electrical panel is. Our electricians will then install something known as a transfer switch where the cable meets the electrical panel.
The only way to legally connect a generator to a home’s electrical system is by running it through a manual or automatic transfer switch. An automatic transfer switch is the best choice since it will allow the generator to automatically start running any time your power goes out.
An automatic transfer switch serves several important purposes. The first is that it continually monitors the electrical current coming into your home. This way the switch will instantly detect if the power goes out so it can signal the generator to turn on and start producing power. As it signals the generator to start, the switch will also isolate or disconnect your home from the electrical grid. This is why transfer switches are a legal requirement, as it is necessary to isolate the home so that the electricity from the generator doesn’t flow into the grid. If the power did flow into the grid, it would be a major safety hazard since it could result in the people working on the grid nearby getting shocked or electrocuted.
Connecting the Generator to the Fuel Source
Along with wiring the generator to your home, it’s also necessary to install new gas lines and connect the unit to whatever fuel source you’re using. The easiest option is to simply tie into your home’s natural gas supply. If you live in a more rural area without access to natural gas, you can also run the generator on propane. In this case, you’ll need a fairly large propane tank that is permanently mounted on your property to ensure that the generator can operate for at least a few days without running out of fuel.
Testing and Breaking in the Generator
In total, installing a home generator typically takes around two days. Once the installation is complete, our electricians will power up the generator and check to make sure it runs smoothly and doesn’t have any issues. They will also need to perform multiple safety tests to make sure that the automatic transfer switch works correctly and signals the generator to run when the power cuts out.
Depending on the type and model of generator you install, it may need to be broken in. This means allowing it to run continuously for around eight hours, which is important for ensuring that all of the engine components are fully lubricated. After the break-in period, you will then need to have the oil changed before the generator is finally ready to work. Some new models don’t need to be broken in, in which case you can immediately have the oil replaced with synthetic as soon as the unit is installed.
Generators are always filled with standard oil at the factory so that they can be tested and to ensure proper lubrication. However, you always need to replace the oil with synthetic before the generator gets any real use.
3 Mountains Plumbing is the top choice for home generator installation in Milwaukie, OR and the surrounding areas. Our expert electricians can also help if you’re looking to install an EV charging station or if you need any other electrical installation or repair services. We provide locals with a complete line of plumbing services as well. For more information on generator installation or any other electrical or plumbing assistance you need, give us a call today.